In the previous section, you generated a collection of pages that support EF Core CRUD operations for the Product entity. As with the order form you created earlier, the generated forms work with strings. The scaffolded input for the product image expects a file name. As it currently stands, there is no means by which the user can store the image file on the web server. Ideally, you want to enable the user to provide an actual file and the application should take care of saving it.
In this section, you will modify the Create form to accept a file upload and then you will add code to save the file so that it can be displayed where necessary within the application.
Note
When storing files for a web application, the two most commonly used approaches involve storing the file within the web server's file system, or in a database in binary format. Both approaches are valid and each has its pros and cons. In this tutorial, you will store the file in the file system along with the existing image files.
Three conditions must exist for successful management of file uploads within a form in an ASP.NET Core application:
- The form must use the
POSTmethod and have anenctypeattribute set tomultipart/form-data - You must use an input with its
typeattribute set tofile - The uploaded file must bind to an
IFormFiletype
Start by opening the /Pages/Products/Create.cshtml.cs file. Add a new property named ProductImage of type IFormFile and apply the BindProperty attribute to it along with a Display attribute:
[BindProperty, Display(Name ="Product Image")]
public IFormFile ProductImage { get; set; }
Next, in the /Pages/Products/Create.cshtml file, change the form tag to include the enctype attribute referred to in the first condition above:
<form method="post" enctype="multipart/form-data">
Alter the Product.ImageName label and form control form group to reference the new IFormFile property as follows. Also, remove the validation tag helper because it is not needed:
<div class="form-group">
    <label asp-for="ProductImage" class="control-label"></label>
    <input asp-for="ProductImage" class="form-control" accept=".jpg, .png" />
    <span class=>
</div>
Now that the input tag helper is bound to an IFormFile property according to the third condition, the value for the type attribute will be set to file automatically, satisfying the second condition. Note also that the input tag helper includes an accept attribute, which should limit any file browser on the client to only expose files with the specified extensions.
When you save files to the filesystem, you need to be able to build full paths. However, locations may not be consistent across environments (development, hosting etc). To mitigate this, you use the IWebHostEnvironment service (registered by default), which provides information about the current environment. As with other services, you inject this into the PageModel and assign it to a field for later use:
public class CreateModel : PageModel
{
    private readonly Bakery.Data.BakeryContext _context;
    private readonly IWebHostEnvironment environment;

    public CreateModel(Bakery.Data.BakeryContext context, IWebHostEnvironment environment)
    {
        _context = context;
        this.environment = environment;
    }
    ...
Finally, you will add code to process the upload which will assign the file name to the ImageName property of the product, and save the actual file to the images/products folder in wwwroot. This takes place in the OnPost handler within the CreateModel class, the revised version of which follows:
public async Task<IActionResult> OnPostAsync()
{
    ModelState.Remove("Product.ImageName");
    if (!ModelState.IsValid || _context.Products == null || Product == null)
    {
        return Page();
    }

    Product.ImageName = ProductImage.FileName;
    var imageFile = Path.Combine(environment.WebRootPath, "images", "products", ProductImage.FileName);
    using var fileStream = new FileStream(imageFile, FileMode.Create);
    await ProductImage.CopyToAsync(fileStream);
    _context.Products.Add(Product);
    await _context.SaveChangesAsync();

    return RedirectToPage("./Index");
}
The default settings for the project has nullable reference types enabled within the Bakery.csproj file:
<Nullable>enable</Nullable>
This setting affects the behaviour of the model binder so that it sees all non-nullable strings as required by default. This includes the ImageName property of the Product class, which the scaffolded code has as a binding target. The change you made to the scaffolded form means that you will not be binding a value to this property. You are binding to the IFormFile property instead. Consquently, The ImageName property will always be null, resulting in a model validation error being registered. So the first thing you need to do is to remove any model state entries relating to this property before you check Modelstate.IsValid.
Assuming that validation is successful, you assign the upload's file name to the Product.ImageName property, then you use the IFormFile.CopyToAsync method to save the uploaded image to the wwwroot/images/products folder. The IWebHostEnvironment.WebRootPath property resolves the file path to the wwwroot folder, and you use that to build up the path to the new image file.
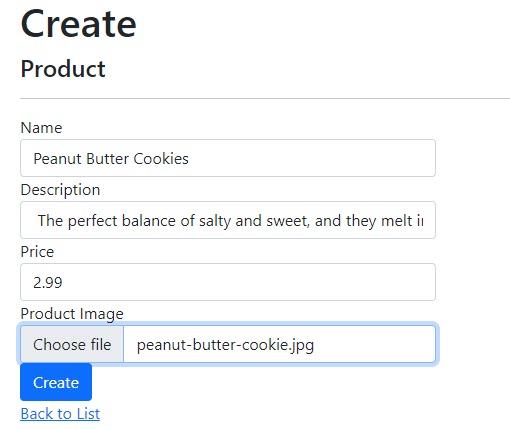
Create a new product and upload an image:

The new product should appear at the bottom on the list in the scaffolded Index page, and as a new entry on the home page:

Summary
In this section, you learned about the three requirements for successful file uploading via a form in Razor Pages and how to implement them. You also learned how to use the `IWebHostEnvironment`` service to resolve the file path to the wwwroot folder.
Previous: Scaffolding
